I am constantly asked by people new to bait casting reels; "How in the world do you pitch and skip a bait with a bait caster?" My answer is usually the same as those who ask how to get to Carnegie Hall? Practice, Practice. But seriously, for those of you who already know how to use this technique, you have to admit, trying to explain the technique is very hard to do without someone working with you one on one.
I've just recently come across a video on YouTube that explains the techniques beautifully and I couldn't have done or said it any better. If you want to learn this technique, which you should if you want to become a better fisherman, please watch the video below. The guy does a fabulous job of showing you how to set up your reel for pitching and skipping a bait without getting a lot of professional overuns as we like to say. This is a great video by a really good teacher who takes the mystery out of the technique and makes it easier to learn and understand. Enjoy !!
Thursday, December 1, 2011
Wednesday, November 30, 2011
Tuesday, September 27, 2011
Friday, September 16, 2011
Will Spinning Rods Dominate the Bass Fishing World of the Future?
What is driving this move away from Baitcasters? I can answer this question in three words "Finesse Fishing Techniques".
I know, you're probably thinking that this must surely be an overstatement of facts, after all, how can spinning rods be used for the same techniques that baitcasters are used for and do them as well or better? Let me explain. In the past, it was widely understood that spinning reels were only practical when fishing line weights up to about 8 or 10lbs max. After that, you needed to switch to baitcasting equipment because Monofilament or Fluorocarbon line became too stiff and line would just shoot off your reel in coils tangling into a knotted mess rendering your spinning rod and reel useless until you cut the line and restrung your reel. Well that used to be the case, but not anymore; not since the introduction of "Braid" to the fishing world. Braid has characteristics that update and bring spinning reels into the 21st Century and make them now competitive alternative to baitcasters, with less headaches and more upside benefits. Using braid on your spinning reels will totally eliminates line coiling and memory issues for good. Braid stays limp and will absorb all line twist, leaving your line completely soft and castable, cast after cast, without those dreaded wind knots. But what about fish being able to see the line if you're using braid? The Pro's have solved that by tying on a Fluorocarbon leader from 5 to 15 feet in length, so fish never see the braid or come in contact with it.
I recently came across some fishing articles by Gary Yamamoto suggesting that he and his Pro team are exploring the conversion to spinning equipment and away from baitcasters as they explore taking finesse fishing to the next level and beyond. It is Gary Yamamoto's theory, that because of the advancements in fishing line technology with the advent of Braid and Fluorocarbon lines, graphite and carbon-fiber rods, and state-of-the-art spinning equipment with drags of up to 15lbs, spinning equipment may be the answer to Bass fishing now and into the future. It is his belief that it is the braid which becomes the overall power and strength of the system and not the rod which has been the case in the past. 10 or 15lb braid is much stronger than the equivalent line of Monofilament or Fluorocarbon. Because Braid and Fluorocarbon doesn't stretch, the bite is transmitted directly through line into the sensitive graphite and carbon-fiber rod blanks and then directly into the fingers of your hand. You no longer need to hold the line between your finger tips to feel a soft or subtle bite. Your hand feels as though it's directly connected to the the bait at the end of the line with any of these setup configurations.
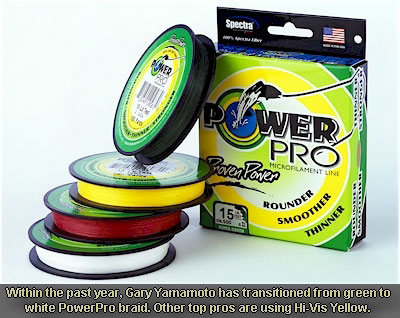
 Gary's team uses 3 different spinning rod weights; a Medium Light, a Medium and Medium Heavy setup covers all their various fishing styles . In all three of these spinning setups the team uses Power-Pro Braids in either 10lb or 15lb White or High-Vis Yellow. They selected White and Yellow Braid lines because they were having too hard a time seeing the Green Braid on the water. Understand that 10lb PowerPro Braid is only 2lb diameter monofilament, thus the need to find something brighter to see the line. Gary Yamamoto mentioned that they were not the only Pro's on the circuit switching to White and High-Vis Yellow Braid. Since they use 5 to 15 feet of Fluorocarbon leader, the fish never see the braid, but they can now see the line jump on previously unseen and undetected bites when they use the higher visibility lines.
Their Medium-light Spinning Rod set ups incorporate 10lb PowerPro Braid as the main line. They then tie a leader of fluorocarbon line in either 5,6,8 or 10lb test depending upon the application and the underwater terrain their fishing. Gary believes that thicker fluorocarbon lines help with abrasions in different fishing environments. Gary uses the Medium-light Spinning setup for most of his lighter finesse fishing techniques and likes using this weight of rod for light crank baits.


I know, you're probably thinking that this must surely be an overstatement of facts, after all, how can spinning rods be used for the same techniques that baitcasters are used for and do them as well or better? Let me explain. In the past, it was widely understood that spinning reels were only practical when fishing line weights up to about 8 or 10lbs max. After that, you needed to switch to baitcasting equipment because Monofilament or Fluorocarbon line became too stiff and line would just shoot off your reel in coils tangling into a knotted mess rendering your spinning rod and reel useless until you cut the line and restrung your reel. Well that used to be the case, but not anymore; not since the introduction of "Braid" to the fishing world. Braid has characteristics that update and bring spinning reels into the 21st Century and make them now competitive alternative to baitcasters, with less headaches and more upside benefits. Using braid on your spinning reels will totally eliminates line coiling and memory issues for good. Braid stays limp and will absorb all line twist, leaving your line completely soft and castable, cast after cast, without those dreaded wind knots. But what about fish being able to see the line if you're using braid? The Pro's have solved that by tying on a Fluorocarbon leader from 5 to 15 feet in length, so fish never see the braid or come in contact with it.
I recently came across some fishing articles by Gary Yamamoto suggesting that he and his Pro team are exploring the conversion to spinning equipment and away from baitcasters as they explore taking finesse fishing to the next level and beyond. It is Gary Yamamoto's theory, that because of the advancements in fishing line technology with the advent of Braid and Fluorocarbon lines, graphite and carbon-fiber rods, and state-of-the-art spinning equipment with drags of up to 15lbs, spinning equipment may be the answer to Bass fishing now and into the future. It is his belief that it is the braid which becomes the overall power and strength of the system and not the rod which has been the case in the past. 10 or 15lb braid is much stronger than the equivalent line of Monofilament or Fluorocarbon. Because Braid and Fluorocarbon doesn't stretch, the bite is transmitted directly through line into the sensitive graphite and carbon-fiber rod blanks and then directly into the fingers of your hand. You no longer need to hold the line between your finger tips to feel a soft or subtle bite. Your hand feels as though it's directly connected to the the bait at the end of the line with any of these setup configurations.
Their Medium-light Spinning Rod set ups incorporate 10lb PowerPro Braid as the main line. They then tie a leader of fluorocarbon line in either 5,6,8 or 10lb test depending upon the application and the underwater terrain their fishing. Gary believes that thicker fluorocarbon lines help with abrasions in different fishing environments. Gary uses the Medium-light Spinning setup for most of his lighter finesse fishing techniques and likes using this weight of rod for light crank baits.

They use a Medium Spinning Rod with 10lb PowerPro Braid as well. To this rig they typically use either 10lb or even a 12lb Fluorocarbon leader in abrasive cover. This rig is used for Shakey Heads, Grubs, Kut Tails, Swim Senko's and Pro Senkos. This setup can also be used with Jigs up to 3/4 ounce.
For their heaviest rig they use a Medium Heavy Spinning Rod spooled with 15lb PowerPro and use a 14lb Fluorocarbon leader. They use this setup for tossing heavy Texas rigged worms or flipping jigs into gnarly cover.
If you want try these setups for yourself, here's how to do it. Because the Braid is ultra-slippery and won't hold without slipping on your spool, you need to use monofilament line as the backing for your spinning reel spool. You should spool on at least 60% of spool with this backing material. As to what pound test to use; you can use 10lb mono or what ever spare monofilament you have laying around. It's not that important because you're never going to get down to the mono anyway if you spool on at least 50 yards of Braid to your Monofilament. To tie the braid initially to your monofilament backing use a uni-to-uni knot for your splice. Here's a diagram of how to tie it.

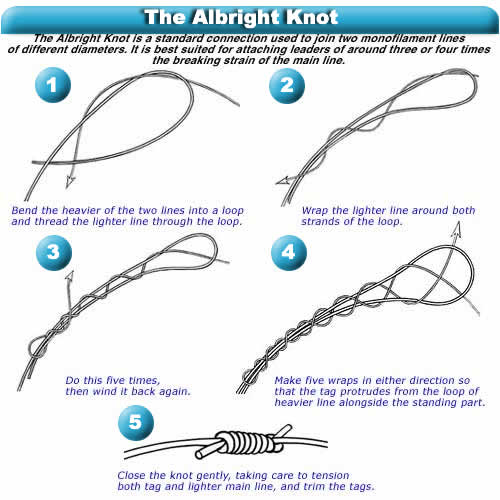
Once you have the Braid spliced to the Monofilament backing, spool on your braid and fill the rest of your spool up to about 1/8th of an inch from the top of your spool. To tie on your Fluorocarbon leader onto your Braid; the best knot I've found that will not fail is an Albright Knot. See below:

Now after you've tied the Albright Knot and cinched it down, make sure you trim the ends of the Braid and Fluorocarbon as close as you can to the knot without clipping the knot. That's a bad thing obviously.
Once you've done this you are ready to spool on whatever length leader you want. Honestly, you could tie on as little as 3 feet. I usually tie on around 15ft when I do it; that allows me to re-tie several times before having to add new leader. Also, only having to tie on this short length of Fluorocarbon makes the spool you buy last a long, long, time before you have to buy another and makes Fluorocarbon a fairly inexpensive investment for those of you on a tight budget. Please note that whenever I've used the Albright Knot for splicing my lines together, I've never had the knot fail or slip. If you tie it right, it won't slip and at the end of the day, you'll start having comfort knowing that you've got line that isn't going to break on a Bass.
The last thing I always do before I take my newly spooled reels out on the lake, is to spray Kevin Van Dams Lure & Line Conditioner onto the line. This stuff really works. It softens new line making it much easier to cast, but doesn't affect the strength. I don't know what's in this stuff, but I'm a believer after using it.
Tight Lines until next time.
Tuesday, June 14, 2011
Easiest Way to Remove a Backlash From Your Baitcaster
There isn't a fisherman or woman who hasn't thrown a bird's nest or as some like to say, a professional over-run onto their bait cast reel at one time or another. It doesn't matter whether or not you had the settings adjusted correctly for the way you cast or your skill level, sometimes "Birds-nests" just happen. Perhaps it happened when you were throwing a lure into the wind. Maybe you forgot to change the tension setting on the spool control knob when you changed lures and tied on something heavier.......for whatever the reason, "BAM", there it is. After you stop cussing, you set about to try and get them out. You start picking and plucking and pulling.....sometimes you win....sometimes you lose and you reach for the scissors to cut the line knots out of your reel.
I've learned a really easy way to get the backlash out quickly and effortlessly and this will work 90% of the time. Before I tell you the secret, let me tell you another one that will help in the process. When you first put new Fluorocarbon or Monofilament line on your reel, before you ever use it, spray the line down with Kevin Van Dam's Lure and Line Conditioner. It's the only product I use on my equipment or sell in the store to customers. When you soak your new line overnight for 24 hours with this stuff, it removes all the memory from the line and softens it, making it more manageable and less prone to backlash in the first place. After you soak your line and wait 24 hours before casting it to allow it to do it's magic, right before you make your first cast, spray your line again and your life on the water will become more pleasurable. This product is incredible and it lasts a long time. Doesn't make your line weaker at all, just make your line softer and more manageable. This stuff works on all lines including braid too. Won't hurt your reel at all and I'm really sold on it. Now, once you've done that and you get a backlash, this will help you get it out much easier now that the line is more manageable.
Getting the "Backlash" out. This is so slick, I wish I'd thought of it first....who ever did figure this out is a genius and I take off my hat to him or her.
Here's what you do. First, tighten the drag down on your real fairly tight. You want to have the drag tightened down enough so that when you do the next step, the line will be forced to move around the reel under heavy downward thumb pressure. Next, if you have a right handed reel, place your left thumb with firm pressure down on the backlashed line. With your right hand, turn the reel handle so the the line and the birdsnest is forced to start moving under your thumb pressure two or three revolutions of the reel. Now, depress the thumb bar release so that it's in free spool mode and place your thumb back down on the line. Now, while you are applying a little pressure to the line, start pull the line out through the front of the reel guide. The birdsnest will start coming out as you pull the line out through the reel guide. Once you reach the next knot, "STOP", don't pull anymore. Place your thumb back onto the spool and knots and press firmly as you again turn the reel handle 2 to 3 revolutions. Now depress the spool release bar again, place you thumb back over the line gently and start pulling the line out again through the reel guide. Continue doing this until the reel is free of knots.
If the birdsnest is not too bad. Sometimes you just have to do it once or twice. If it's a stubborn one, it make take several attempts before you finally free the line and remove all the knots. Since I've learned this trick, birdsnest frustration has become a thing of the past. Try this the next time you get a professional over-run. You'll never have to cut your line again or spend your day picking out knots from your spool. This really works.
Once you've freed the knots from your reel, make sure to spray your reel again with Kevin Van Dam's Lure and Line conditioner and get on with your fishing.
Thursday, April 21, 2011
Bass Just Can't Resist The Don Iovino Reaper
 A few weeks ago I was online looking for some new finesse baits to add to my bass fishing arsenal, when I came across the name Don Iovino in a bass fishing article. If you've never heard of Don Iovino, let me tell you that he was and still is one of the nations top bass fishermen and soft bait designers and has won virtually every fishing tournament both here in America and abroad. He is a charter member of the International Fishing Hall of Fame and is considered by many to be the father of finesse fishing in the United States. Now that we've established Don Iovino's background........ I came across a video on You Tube showing this young man fishing one of Don Iovino's 6"Reaper baits and catching a fabulous 6lb bass on his first cast. This intrigued me to investigate his baits further, because I remembered that I had fished with one of Don's small Reaper designs on a Drop Shot rig at Lake Casitas in Southern California the year before. That Reaper Drop Shot bait was given to me to use by a Tournament Bass Pro there. This Pro's Reaper was his secret drop shot bait he had made for him in a special proprietary color by RoboWorm, makers of fabulous hand poured worms in Southern California and the go-to plastic used by most tournament Bass Pro's.
Later that night I found his email address and sent Don an email asking him to recommend what size Reapers and what colors did he think would work best in my area here in Arizona fishing local urban lakes, Bartlett Lake and Lake Pleasant?
Before I continue on with my story, you've got to be asking yourself the question, "Hey Dave, what the heck is a Reaper"? I'm glad you asked. The Reaper Don invented would kind of remind you of a giant or in the case of his Drop Shot Reapers; not so giant....... Leech looking soft plastic bait.
 The next morning when I checked my computer, I had an email from Don asking me to give him a call at his office, which I promptly did. Don, I might add at this point, is really a nice guy who is now in his 70's, but still fishing and making his famous Reapers. We talked for about 45 minutes on the phone and he said, "Tell you what Dave, let me put together some product for you that will work in your area on the lakes you fish." He said he knew what would work in my area, because he had fished tournaments on those lakes in the past. Before we hung up the phone he said to me, "Once you get my baits and fish them, I know you'll be calling me back soon to order more, I can guarantee it." I agreed to let him select some baits for me and received his baits a few days later. After opening the package and seeing these beautiful baits, I could hardly wait until the next day to try them out. In the package he had sent me a few styles of his Reapers in different color combinations for the gin clear water of Lake Pleasant to the stained water of Bartlett Lake. He suggested that I use the 6"version for the Shakey Head technique, 4" for Carolina, Shakey Head and Split Shot rigs and the 3" versions for Drop Shotting.
The next day I headed out to one of the urban lakes not far from my house to try them out. I rigged the 6" Reaper he sent me in his "Liver" color on an 1/8oz Shakey Jig head called a Spot Remover Pro by Buckeye Lures. I also rigged up one of his 4" Reapers on a Luck "E" Strike Bass Magic Shakey Head jig too just for kicks and giggles.


If you don't know how how to fish a Shakey Head, you need to read my article on "Flick Shaking, The Hottest New Bass Technique." posted on my blog site below.....because the way you work a Shakey Head is based on the same technique as Japanese Flick Shaking.
Cast the Shakey Head lure on your spinning tackle rigged with 6lb Fluorocarbon fishing line. I use Seaguar Invisix because I think that it's one of the softest fluorocarbon lines and it's made by the people who invented Fluorocarbon fishing line. You can use anyones line, I just prefer Seaguar.
Now, once you've cast your lure let it sink to the bottom. Take out most of the slack and leave a bow in your line. You're leaving the bow in the line because your going to start shaking the slack that this bow creates in a constant rhythm. The tempo of this rhythm is to the song "Jingle Bells"we all grew up singing. That's the speed of the shaking. Now shake this slack because under the water, this Reaper is going to be doing it's undulating dance, sending out vibrations and wiggling like a snake under the water. If you're not hit immediately after the fall and after shaking for about 30 to 40 seconds, continue the rhythm and as you keep shaking the line, turn your spinning reel a 1/2 crank as you move the bait back towards you. Every 30 or so seconds turn the crank again making sure to leave slack in your line. You can occasionally make a couple of upward pops with your rod tip to make the bait jump forward a few inches but don't go crazy.....just keep shaking the slack the whole time. When Mr. Bass hits your lure, it isn't going to be earth shattering....its' going to be similar to a Drop Shot bite. You're going to feel a slight pressure and the pressure will continue building as you let the rod tip start bending and loading the rod up. Watch your line, because you're going to start seeing it moving sideways as your tip bends and the rod loads up. Now, just like the Drop Shot bite, don't yank, but instead lift your rod tip and start cranking and the bass will hook it'self. Once Mr. Bass starts feeling the resistant pressure in his mouth as he swims away, he instinctively clamps down on the bait to keep it from escaping......So, when you pull the rod tip up and start cranking your reel quickly, Mr. Bass winds up hooking himself and the fight is on. Keep the pressure on him as you reel because he's more than likely going to surface and try and throw the jig out of his mouth. Don't let him and he's yours to bring in.
I think one of the keys to fishing Urban Lakes that have seen everything known to man thrown at them and as the fish are caught by the same ole baits that everyone throws, it becomes harder and harder to catch them. Once they've been caught on a specific bait and been traumatized by the experience, you'll have a hard time catching them again with that same bait. That's why you need to show them something they've never seen before. That's the key to catching them over and over again. Don't think you just have to throw Senko's or Flukes at them. That's why the Reaper is a Keeper.....and Thank You, Mr. Don Iovino for creating them for us.
You can order Reapers from Don Iovino directly at www.iovino.com or at www.tacklewarehouse.com.
Friday, January 21, 2011
The Best Knot Tyer I've Ever Seen OR Used
 |
| TIE-FAST KNOT TYER |
I think that it's safe to say that we all know at least one, two or three knots that we use on a consistent basis for tying lures to our line. Most likely they'll be one of the following: cinch, improved cinch, uni, or uni-to-uni for attaching braid to fluorocarbon line, and the easy to tie Palomar knot. On top of that, sometimes we can tie a cinch or an improved cinch knot onto a plug, crankbait or spinner and cast any of these and watch as the knot gives and our bait goes flying, splashing into the lake, never to be seen again. Or just maybe, we hook onto a really nice fish and we get him right up to the boat or shoreline and he takes one last thrash and the line appears to break or the knot loosens and our fish gets off to fight another day with our lure or bait in it's mouth. Yep, been there..... done that, and I know that you have too. The other thing that's tough for all of us as we get older is our eyesight isn't what it used to be. Threading that 4lb or 6lb fluorocarbon line gets really hard to see if it went through the eye of the hook or missed it by "That Much", as the TV comedy character Maxwell Smart used to say on that old television comedy "Get Smart".
The other thing that gets to all of us is once summer has left us and were into the chilly mornings of fall and our hands are cold. Yeah, tell me about how hard it is to tie that lure onto your line when your fingers and joints are numb. It can be torture and that's for sure. Next, you're always wondering if you tied that improved cinch knot correctly and did you remember before you cinched it down to wet it with saliva real good? Did that knot weaken because you cinched it down to quickly and weakened the line? Maybe you'll never know for sure, but if you're like me, it's probably in the back of your mind.
When you're joining braid to fluorocarbon and you tie two uni-knots together and spool that fluorocarbon onto your spinning reel and go to make that first cast, have you ever had the uni-knots catch the fluorocarbon right where it joins the braid and stop your cast? Yeah, me too; or if that didn't happen your knot clips the eyelet on the way out at the tip of your rod and screws up your cast. Is thats what's troubling you bunkie? Well, hang on to your rod and reels, cause I think I've finally found the answer and a solution to your prayers......"The Tie-Fast Knot Tyer" from Sierra Stream & Mountain in Chico, California. You can find them online, Bass Pro Shops, Cabelas or Fly-Fishing stores. They sell for $7.99 most places and it's the bomb, I'm telling you. This tool makes nail knots a piece of cake and you can tie them with cold hands and almost with your eyes closed. You can join braid to mono or fluorocarbon and the resulting knots are better and easier than tying double uni-knots. They are also much smaller too, so they won't catch on your eyelets when you're casting. This nail knot tool is basically all I ever use, except for the Palomar knot when I'm tying a drop shot rig on. The amazing thing about these knots are....I've never had one come loose, because the more you tighten it, the tighter it becomes, so a fish will never break this knot. The line will break before the knot will.
I found this tool in the Fly-Fishing section of Bass Pro Shops. Just watch the video above and ignore the fact that he's talking about fly lines in this video. Substitute braid and mono or floro for the flyline stuff as you're watching the video. This tool is cool and you'll use it to make nail knots to replace the uni, double- uni, cinch, improved cinch or San Diego Jam knot. Try it Mikey, you'll like it.
Tight Lines.
Dave Roberts
Monday, January 17, 2011
"Flick Shake"-The Hottest New Bass Technique
 |
| 4.8" (Plum Flick n' Shimmy) worm from Bass Pro "Skinny Bear Wacky Finesse Jig" Head painted with Purple Sparkle Nail Polish |
First, it's important to note that FlickShaking is a "Finesse Technique" and it will be your presentation skills, that I will explain in detail, that will make this technique so successful for you. Since the Japanese bass fishermen have already done all the research and development in refining the technique, all you have to do is to implement it.
The Japanese found that this technique works best when you use either an Ultra-Light or Light weight, carbon fiber spinning rod, that is anywhere between 5' to 6.5" feet in length. They prefer the shorter rod lengths because they feel, and I agree with their reasoning, that you can feel the bait, the bottom, and the fish easier with a shorter rod length. A flexible, 'whippy', rod tip is best for this technique, which is why the Ultra-Light or Light spinning rods work best for this technique. Next, you need to spool your spinning reel with 4-6lb Fluorocarbon line. They've found that lighter line allows the bait presentation to fall and look more natural in the water. After months of using this technique and trying different brands of line, my own conclusion is that 4lb Seaguar "InvizX"or 5lb Sunline FC Sniper Fluorocarbon lines are the best by far for this technique. Both are strong lines with less memory and are invisible in the water. When you spool the new lines onto your spinning reel, make sure you treat your new line the night before you go fishing with Kevin Van Dam's Line and Lure Conditioner. It removes the memory from the line and keeps your line soft and limp. I use it every time I take my rods and reels out of the car and periodically while I'm fishing. Like they say, "An ounce of prevention is worth a pound of cure," and his product works the best at keeping your line from tangling and coiling into itself.
The Japanese found that this technique works best when you use either an Ultra-Light or Light weight, carbon fiber spinning rod, that is anywhere between 5' to 6.5" feet in length. They prefer the shorter rod lengths because they feel, and I agree with their reasoning, that you can feel the bait, the bottom, and the fish easier with a shorter rod length. A flexible, 'whippy', rod tip is best for this technique, which is why the Ultra-Light or Light spinning rods work best for this technique. Next, you need to spool your spinning reel with 4-6lb Fluorocarbon line. They've found that lighter line allows the bait presentation to fall and look more natural in the water. After months of using this technique and trying different brands of line, my own conclusion is that 4lb Seaguar "InvizX"or 5lb Sunline FC Sniper Fluorocarbon lines are the best by far for this technique. Both are strong lines with less memory and are invisible in the water. When you spool the new lines onto your spinning reel, make sure you treat your new line the night before you go fishing with Kevin Van Dam's Line and Lure Conditioner. It removes the memory from the line and keeps your line soft and limp. I use it every time I take my rods and reels out of the car and periodically while I'm fishing. Like they say, "An ounce of prevention is worth a pound of cure," and his product works the best at keeping your line from tangling and coiling into itself.
Next are the jigs you'll need. The best jigs for this technique are made by a Japanese company called Zappu. These jigs are called "Zappu Inchi Wacky Heads" and can be found online at Tackle Warehouse on the west coast and many other online sellers across the country. These jigs come in 1/8th, 3/16th and 3/32nd of an ounce. Depending on the water conditions and the depth you're fishing, you want to always go with the lightest weight jigs you can get away with. You'll need all three sizes, particularly if you're not fishing on calm waters. "Jackall" by Lake Police co-invented the jigheads for this technique, but what makes Zappu better in my opinion, is Zappu's use of a 60 degree eye angle on the Tungsten head. This angle gives the worm better action in the water. Zappu has also created a flat bend behind the hook that traps the bait better than Jackall's jig head. Don't get me wrong here, Jackall makes a great jig head too, I just think the action is a little better on the Zappu version. Another company called "Skinny Bear" makes a jig head that also works great for this technique. The jig head I've been playing with lately is the Gamakatsu Wacky Head that you can see in the Bass's mouth in the picture in this article. This jigs pendulum action works like the Zappu jig does and I like the red color they've added to it. Kinda makes the bait look like it might be bleeding and in trouble.....but who knows?
Now lets talk about the bait. I've been very successful using 3 baits; Jackall's 4.8" FlickShake Worms in "Watermelon Candy""Cinnamon Solid" and "Sunburn Melon", Bass Pro Shop's "Flick n' Shimmy" 4.8" worm. It is an exact copy of Jackall's version but for less money. I've been very successful in using the "Plum"color. Last, is Gary Yamamoto's 4" Shad Shape Worm in "Natural Shad" color. These are all the baits you'll need.
The technique. Once you rig one of these wacky jigs onto your line, rig any of the Jackall FlickShake worms the following way. The worm as designed has a fat end and a thin end. You'll notice that the fat end curves in one direction and the tip curves in the opposite direction. Turn the worm so that the fat end pointing downward. Take the jig hook point and come up the bottom through the middle of the worms egg sac at a straight 90 degree angle right through the center of the worm. Then slide the worm down onto the crook of the hook just past the hook point and your ready to go. Next, you want to cast this worm and jig out as far from shore as you can cast it. The longer the cast, the more area you'll be able to find a bass in as you work the jig back to you. Let it sink and do nothing for the next 30 seconds except slowly take our the excess slack out of the line. Sometimes a bass will hit the worm on the fall, but I've only had that happen to me just a couple of times in the months I've been fishing this technique. Now, just like in drop shoting, reel up the excess slack until you have a bow in the line from your rod tip to where the line enters the water. Hold your rod tip at the 10-11 o'clock position and start shaking or jiggling your rod tip back and forth approximately 4-6 inches in a steady up and down rhythm. That rhythm in your head and speed of the shaking should be to the tempo of that Christmas classic, "Jingle Bells". Don't laugh...that's the speed you should be shaking the rod tip, about 3 shakes per second. Think about shaking your rod tip 3 shakes per second and you'll have the correct tempo of the shake down pat. Now as your shaking the worm, what you'll not see is the worm dancing like crazy under the water in place. Shake, Shake, Shake for about 20 seconds and then dead stop for 15 seconds and keep watching your line. If you see it moving now, set the hook like you do when your drop shoting. Just start pulling the rod back and reel man, reel. The fish will hook it'self and it will usually be just inside the lip. In any case, if the line isn't moving when you stopped the shaking, start shaking again in rhythm as you turn your reel one half turn. If nothing happens after 30 to 40 seconds, turn the reel a half turn again as the bait moves forward and towards you in the water. You can stop every now and then to see if a Bass might have been following the bait, but is waiting to see if it's dead before he hits the bait and starts swimming off with it. Work your casts like the face of a clock. You can start at the 9 o'clock position and work your way over to the 3 o'clock position before moving to another section of the urban lake your fishing.
The Bite: When a Bass hits this worm it usually is a "Thump, Thump" or "Tap, Tap" feel. When this happens, I just stop moving the rod and watch the line. Sometimes a Bass will pop your bait like it's knocking it out or stunning it but won't take your offering just yet. Sometimes after a "Thump" I'll stop and wait and maybe 5 to 10 seconds later he'll take it and start swimming with it. That's when you pull back and on the rod and start reeling and the fight is on. What you'll usually feel when a bass takes the bait is a spongey pressure feeling coming from your rods tip, almost like the hook might be caught on something. When that happens, look at your rod tip and you'll see it starting to pull downward. Let it pull downward until you start to feel the weight of the fish, because he's got it in his mouth and is starting to swim away with it, then pull the rod back and start reeling quickly. Fish On, at that point and the rest is bringing that bad boy in. If the rod tip doesn't start pulling downward, just pull gently backwards towards you and the jig will free itself from what ever it's caught on and you can start the FlickShaking all over again.
 |
| Bass Who Couldn't Resist The FlickShake Technique I'm using the"Gamakatsu Wacky Head" and "Gary Yamamoto, 4 inch Shad Shaped Worm" Natural Shad Color |
The Bite: When a Bass hits this worm it usually is a "Thump, Thump" or "Tap, Tap" feel. When this happens, I just stop moving the rod and watch the line. Sometimes a Bass will pop your bait like it's knocking it out or stunning it but won't take your offering just yet. Sometimes after a "Thump" I'll stop and wait and maybe 5 to 10 seconds later he'll take it and start swimming with it. That's when you pull back and on the rod and start reeling and the fight is on. What you'll usually feel when a bass takes the bait is a spongey pressure feeling coming from your rods tip, almost like the hook might be caught on something. When that happens, look at your rod tip and you'll see it starting to pull downward. Let it pull downward until you start to feel the weight of the fish, because he's got it in his mouth and is starting to swim away with it, then pull the rod back and start reeling quickly. Fish On, at that point and the rest is bringing that bad boy in. If the rod tip doesn't start pulling downward, just pull gently backwards towards you and the jig will free itself from what ever it's caught on and you can start the FlickShaking all over again.
Lately I've been using, as you can see in the picture directly above, Gary Yamamoto's 4" Shad Shaped worm in the Shad color. On one of the local Urban ponds here in Phoenix about a month ago I started throwing this bait rigged wacky style by inserting the hook point starting at the bottom of the middle of the body of the bait and bringing the hook directly out through the middle of the flat surface on the top. It must look like a dying minnow or shad to the bass because on that day I caught 10 Bass in 10 casts with that bait. The total number I caught that morning was 35 Bass in about an hour and a half. I personally practice catch and release so that someone else can have fun to. It was an incredible hour of fishing. Since discovering this technique I've caught literally 100's of Bass FlickShaking. If there are bass swimming in the area where you throw this rig, I can guarantee you that you'll catch them with this technique when you can't catch them on a crank bait or any other rig. I've taught this technique to some of my diehard, old school, fishing friends, who thought the idea was crazy, but after they started catching bass one after another have become FlickShaking converts. Just try it and you'll thank me for the rest of your fishing days.
Tight Lines
Tight Lines
Sunday, January 16, 2011
Welcome To Urban Fishing HQ
So what exactly is Urban Fishing? Let's face it, not everyone owns a boat, can afford one, has a garage big enough to store one or for that matter, a vehicle that could haul it and a trailer anyway. A lot of American fishermen, myself included, live inside a city and are not fortunate enough to live beside a lake. For those of us who fit into this category, I dedicate this website to you. In the coming months I hope to develop this site into (the place) to come for urban fishermen everywhere. Whether you fish for Bass, Crappie, Catfish, Trout or Walleye, this is the site that will help you gather fishing knowledge that will make you a better fisherman.
Stay Tuned.
Stay Tuned.
Subscribe to:
Posts (Atom)