|
4.8" (Plum Flick n' Shimmy) worm from Bass Pro
"Skinny Bear Wacky Finesse Jig" Head painted with
Purple Sparkle Nail Polish
|
The FlickShake concept may have originated in Korea, but it was the Japanese who took the concept and refined the technique into the fish catching art form it is today. As to who the fisherman was that invented the technique, my hat is off to you, because once you've mastered this technique, you will be able to catch more Bass than any other technique in your fishing arsenal.
First, it's important to note that FlickShaking is a "Finesse Technique" and it will be your presentation skills, that I will explain in detail, that will make this technique so successful for you. Since the Japanese bass fishermen have already done all the research and development in refining the technique, all you have to do is to implement it.
The Japanese found that this technique works best when you use either an Ultra-Light or Light weight, carbon fiber spinning rod, that is anywhere between 5' to 6.5" feet in length. They prefer the shorter rod lengths because they feel, and I agree with their reasoning, that you can feel the bait, the bottom, and the fish easier with a shorter rod length. A flexible, 'whippy', rod tip is best for this technique, which is why the Ultra-Light or Light spinning rods work best for this technique. Next, you need to spool your spinning reel with 4-6lb Fluorocarbon line. They've found that lighter line allows the bait presentation to fall and look more natural in the water. After months of using this technique and trying different brands of line, my own conclusion is that 4lb Seaguar "InvizX"or 5lb Sunline FC Sniper Fluorocarbon lines are the best by far for this technique. Both are strong lines with less memory and are invisible in the water. When you spool the new lines onto your spinning reel, make sure you treat your new line the night before you go fishing with Kevin Van Dam's Line and Lure Conditioner. It removes the memory from the line and keeps your line soft and limp. I use it every time I take my rods and reels out of the car and periodically while I'm fishing. Like they say, "An ounce of prevention is worth a pound of cure," and his product works the best at keeping your line from tangling and coiling into itself.
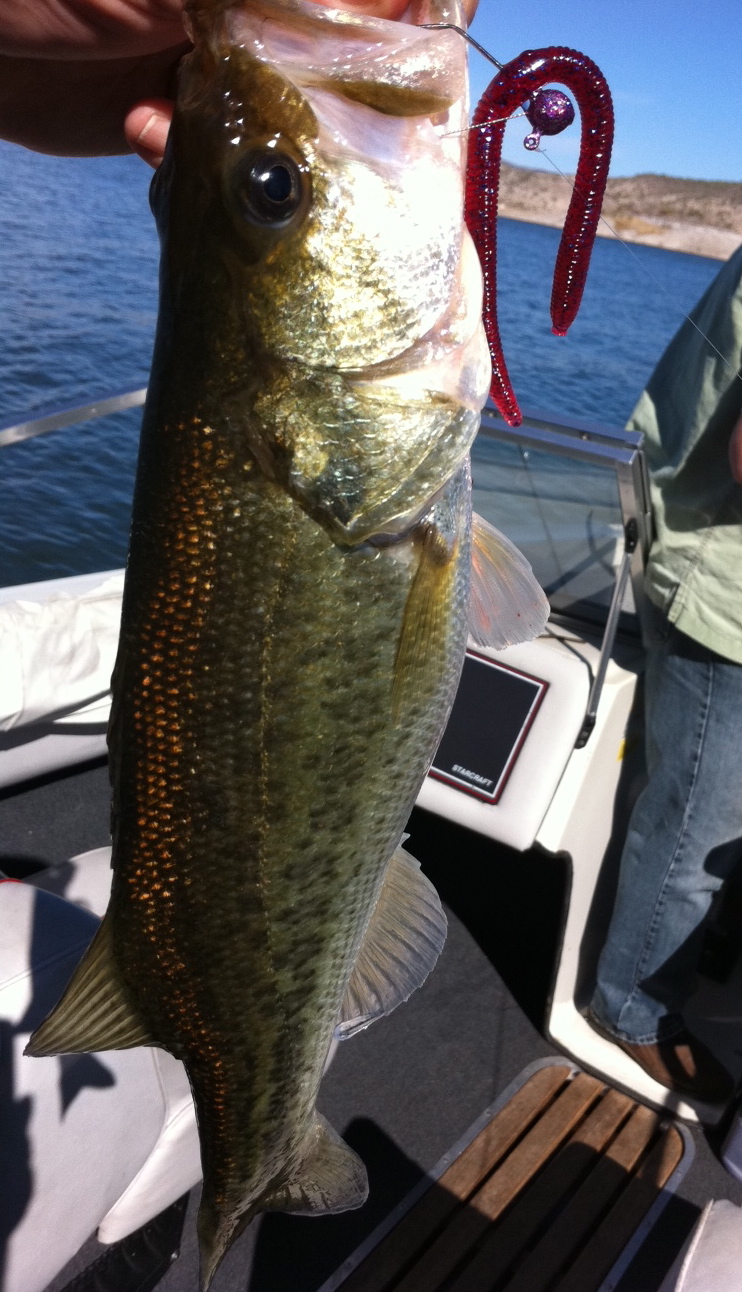
Next are the jigs you'll need. The best jigs for this technique are made by a Japanese company called Zappu. These jigs are called "Zappu Inchi Wacky Heads" and can be found online at Tackle Warehouse on the west coast and many other online sellers across the country. These jigs come in 1/8th, 3/16th and 3/32nd of an ounce. Depending on the water conditions and the depth you're fishing, you want to always go with the lightest weight jigs you can get away with. You'll need all three sizes, particularly if you're not fishing on calm waters. "Jackall" by Lake Police co-invented the jigheads for this technique, but what makes Zappu better in my opinion, is Zappu's use of a 60 degree eye angle on the Tungsten head. This angle gives the worm better action in the water. Zappu has also created a flat bend behind the hook that traps the bait better than Jackall's jig head. Don't get me wrong here, Jackall makes a great jig head too, I just think the action is a little better on the Zappu version. Another company called "Skinny Bear" makes a jig head that also works great for this technique. The jig head I've been playing with lately is the Gamakatsu Wacky Head that you can see in the Bass's mouth in the picture in this article. This jigs pendulum action works like the Zappu jig does and I like the red color they've added to it. Kinda makes the bait look like it might be bleeding and in trouble.....but who knows?
Now lets talk about the bait. I've been very successful using 3 baits; Jackall's 4.8" FlickShake Worms in "Watermelon Candy""Cinnamon Solid" and "Sunburn Melon", Bass Pro Shop's "Flick n' Shimmy" 4.8" worm. It is an exact copy of Jackall's version but for less money. I've been very successful in using the "Plum"color. Last, is Gary Yamamoto's 4" Shad Shape Worm in "Natural Shad" color. These are all the baits you'll need.
The technique. Once you rig one of these wacky jigs onto your line, rig any of the Jackall FlickShake worms the following way. The worm as designed has a fat end and a thin end. You'll notice that the fat end curves in one direction and the tip curves in the opposite direction. Turn the worm so that the fat end pointing downward. Take the jig hook point and come up the bottom through the middle of the worms egg sac at a straight 90 degree angle right through the center of the worm. Then slide the worm down onto the crook of the hook just past the hook point and your ready to go. Next, you want to cast this worm and jig out as far from shore as you can cast it. The longer the cast, the more area you'll be able to find a bass in as you work the jig back to you. Let it sink and do nothing for the next 30 seconds except slowly take our the excess slack out of the line. Sometimes a bass will hit the worm on the fall, but I've only had that happen to me just a couple of times in the months I've been fishing this technique. Now, just like in drop shoting, reel up the excess slack until you have a bow in the line from your rod tip to where the line enters the water. Hold your rod tip at the 10-11 o'clock position and start shaking or jiggling your rod tip back and forth approximately 4-6 inches in a steady up and down rhythm. That rhythm in your head and speed of the shaking should be to the tempo of that Christmas classic, "Jingle Bells". Don't laugh...that's the speed you should be shaking the rod tip, about 3 shakes per second. Think about shaking your rod tip 3 shakes per second and you'll have the correct tempo of the shake down pat. Now as your shaking the worm, what you'll not see is the worm dancing like crazy under the water in place. Shake, Shake, Shake for about 20 seconds and then dead stop for 15 seconds and keep watching your line. If you see it moving now, set the hook like you do when your drop shoting. Just start pulling the rod back and reel man, reel. The fish will hook it'self and it will usually be just inside the lip. In any case, if the line isn't moving when you stopped the shaking, start shaking again in rhythm as you turn your reel one half turn. If nothing happens after 30 to 40 seconds, turn the reel a half turn again as the bait moves forward and towards you in the water. You can stop every now and then to see if a Bass might have been following the bait, but is waiting to see if it's dead before he hits the bait and starts swimming off with it. Work your casts like the face of a clock. You can start at the 9 o'clock position and work your way over to the 3 o'clock position before moving to another section of the urban lake your fishing.
 |
Bass Who Couldn't Resist The FlickShake Technique
I'm using the"Gamakatsu Wacky Head" and "Gary Yamamoto, 4 inch
Shad Shaped Worm" Natural Shad Color |
The Bite: When a Bass hits this worm it usually is a "Thump, Thump" or "Tap, Tap" feel. When this happens, I just stop moving the rod and watch the line. Sometimes a Bass will pop your bait like it's knocking it out or stunning it but won't take your offering just yet. Sometimes after a "Thump" I'll stop and wait and maybe 5 to 10 seconds later he'll take it and start swimming with it. That's when you pull back and on the rod and start reeling and the fight is on. What you'll usually feel when a bass takes the bait is a spongey pressure feeling coming from your rods tip, almost like the hook might be caught on something. When that happens, look at your rod tip and you'll see it starting to pull downward. Let it pull downward until you start to feel the weight of the fish, because he's got it in his mouth and is starting to swim away with it, then pull the rod back and start reeling quickly. Fish On, at that point and the rest is bringing that bad boy in. If the rod tip doesn't start pulling downward, just pull gently backwards towards you and the jig will free itself from what ever it's caught on and you can start the FlickShaking all over again.
Lately I've been using, as you can see in the picture directly above, Gary Yamamoto's 4" Shad Shaped worm in the Shad color. On one of the local Urban ponds here in Phoenix about a month ago I started throwing this bait rigged wacky style by inserting the hook point starting at the bottom of the middle of the body of the bait and bringing the hook directly out through the middle of the flat surface on the top. It must look like a dying minnow or shad to the bass because on that day I caught 10 Bass in 10 casts with that bait. The total number I caught that morning was 35 Bass in about an hour and a half. I personally practice catch and release so that someone else can have fun to. It was an incredible hour of fishing. Since discovering this technique I've caught literally 100's of Bass FlickShaking. If there are bass swimming in the area where you throw this rig, I can guarantee you that you'll catch them with this technique when you can't catch them on a crank bait or any other rig. I've taught this technique to some of my diehard, old school, fishing friends, who thought the idea was crazy, but after they started catching bass one after another have become FlickShaking converts. Just try it and you'll thank me for the rest of your fishing days.
Tight Lines